
Toilet papers are staples in the bathroom. Together with a holder, they make tissue dispensing and refilling much easier.
However, you may eventually encounter the loosening of the toilet paper holder. It can be confusing at first, since you would not see any screws on the item and will need to unravel the insides of the paper holder.
Fortunately, procedures to fix one arm toilet paper holder and those with multiple arms are the same. And you will only need simple tools to do it. Read on and learn how to fix a loose toilet paper holder.
Step-by-Step to Fix a Loose Toilet Paper Holder
What to prepare:
- Flathead screwdriver
- Allen wrench
- Phillips-head screwdriver
- Drywall anchors/toggle bolts
- Drill bit (optional, based on anchor measurement)
- Electric drill (optional)
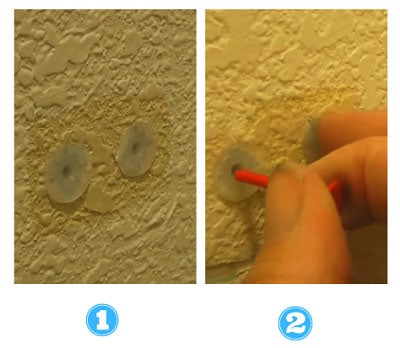
Step #1: Loosen and remove the holder’s arm
Find the grub screws at the bottom side of your toilet paper holder. Using a flathead screwdriver or allen wrench, set one arm of the toilet paper holder loose, remove it, and put it aside.
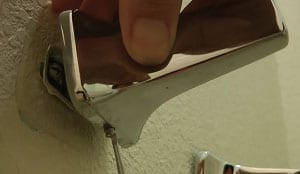
You can place the grub/set screw and the arm on a cabinet to prevent losing it. You will not be able to put a toilet paper holder on the wall without set screws, so don’t lose them.
This step should expose the metal bracket that is attached to the drywall of your bathroom. If your toilet paper holder has two arms, repeat this step to the other arm.
Step #2: Tighten the screws (if they are slightly loose).
Start to fix a toilet paper holder by observing the metal bracket and the couple of screws securing it. It may be just a little bit loose and can be tightened easily.
Tighten a toilet paper holder using a screwdriver that matches the screws attached, usually a Phillips-head screwdriver, and rotate it clockwise.
Check if both screws, together with the metal bracket, are completely secured into the wall.
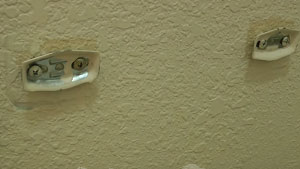
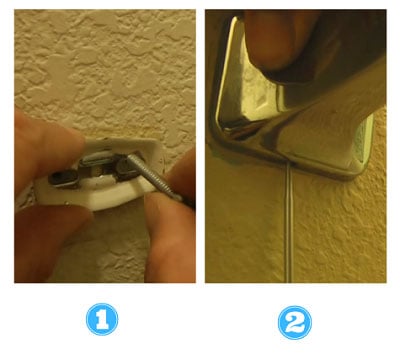
Step #3: Remove the screws and metal bracket (if the holder is severely loose).
But not all loosening can be fixed by tightening and rescrewing the brackets only. In severe cases, replacement of the screws as well as the wall anchors it attaches to is necessary.
After removing the decorative arm, proceed by removing the screws and the metal bracket/plates. You’ll also need to remove the old drywall anchors of your holder.
Avoid removing the wall anchors with the screws still intact. This will leave bigger holes in drywall. Remove the screw first before pulling the anchors out.
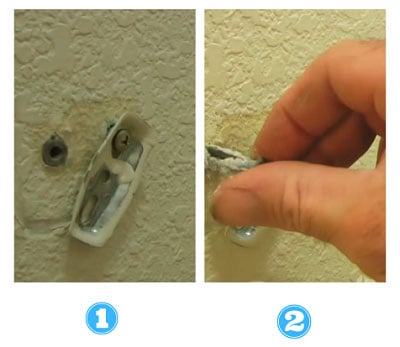
Step #4: Install new drywall anchors.
You will need to visit your nearest hardware store to secure new screws and wall anchors. You cannot proceed without screws and anchors to replace the worn out ones.
Check your chosen anchor and its hole size, so you can also buy a drill bit of the same measurement.
It is recommended to use toggle bolts, which are drywall anchors that have ‘wings’. They provide better grip to the wall, unlike the usual plastic anchors that come with the toilet paper holder.
Insert the toggle anchors in the drywall’s hole. If needed, drill a bigger opening using the drill bit to account for the toggle anchor’s size.
You should hear a snapping sound to confirm that the ‘wings’ have opened up. Other kinds of toggle bolts provide pins to open up the wings after being inserted to the wall. Simply push the pins into the anchors then take them out.
Step #5: Secure the metal bracket and reattach the arm.
Use the screw for the toilet paper holder you removed and reattach the metal bracket.
After this, it’s time to attach the toilet paper holder to the wall again. Reattach the decorative arm(s) and tighten the grub or set screw of the toilet paper holder.
You’re basically done after you’re able to hang a toilet paper holder back to its place and it is now steady as a rock.
Additional Tips
- It could be inefficient to try to re-screw and fix ripped out toilet paper holder. Replace a toilet paper holder if damages are already severe.
Make sure to find great quality hardware to minimize costs in the long run. Check out Restoration hardware toilet paper holders for the best options.
- Take note of the type and size of your wall screws before selecting a tool to remove them. Sometimes, you may need an eyeglass screwdriver.
- When using metal toggle bolts, fold the wings and insert the pointy side to the wall first.
Put your fingers behind the metal bracket while screwing to create resistance.
This prevents the wings from spinning alongside the screw and keeps it in place as you secure the bracket.
- Be mindful when using electric drills to tighten the metal bracket. Switch to screwdrivers before approaching the drywall to avoid possible damages.
Conclusion
Toilet paper holders are helpful pieces of hardware as we go by our bathroom schedules. But as we pull sheets of tissue everyday, screws securing the holder can loosen bit by bit.
If you already know the basics on screwing techniques as well as how to use a drill, learning how to fix a loose toilet paper holder should be a piece of cake.
But for those who are new to such things, there’s no need to worry, since this guide can help you go through the simple steps on securing, or even replacing, the loose screws in your toilet paper holder.
Related: Best place to Put a Toilet Paper Holder for a Small Bathroom?

I’m Paulk Webb, and I work as a writer for Saveourwaterrebates. I’m happy to put in the time and effort to conduct market research to identify the most pressing issues faced by households concerning their plumbing. Feel free to check out our guides to get the most informed recommendations for how to solve your problems.