
Your toilet at home works because all its components are connected properly for the intended purpose. One of them is the lock nut that holds the fill valve and fixtures. You’ll need to keep an eye on it as it’s made of plastic and sometimes not strong enough to deliver the much-needed support.
This nut also absorbs the vibration when the toilet is flushing and prevents leakage from the water tube and tank bottom. If some issues arise from these toilet components, you’ll need the answer to this question ‘How to remove plastic nut from toilet tank?’
You need to remove the plastic nut when repairing the toilet tank and replacing or removing valves as well as tubes. To be able to do it yourself, read this article.
Table of Contents
Guide on Removing Plastic Nut From Toilet Tank
Dealing with plumbing fixtures like toilet parts can be intimidating. An example of this is removing the lock nut from the toilet fill valve. Don’t fret as you can do it as long as you know the right steps.
You have to start with turning off the water supply by the fill valve. It’s necessary to drain the toilet tank by siphoning or flushing the water. You can remove the flush valve lock nut that is made of plastic using an adjustable wrench or pliers.
Before you can remove it, you have to locate the plastic nut. Lubrication is essential and can be done with the help of the plumber’s grease. You’re lucky as every small detail is tackled in this guide.
Things you’ll need:
- Pliers
- Hex wrench
- Adjustable wrench
- Rag
- Bucket
- Hose (for siphoning)
It’s normal to have a rag and bucket every time water is present. As expected, you’ll face a wet mess when removing the lock nut from your toilet. Everything will be under your control once you follow these steps.
Step 1: Getting rid of water
Turn off the water supply so the tank is not full. Check the toilet’s back to look for a supply hose. It’s responsible for delivering the water with a fill valve on the wall so you can allow or stop the water flow. Turn the fill valve to shut off the water. To confirm that the tank won’t be filled with water, flush the toilet. If nothing happens, it means that the supply is off.
Step 2: Draining the tank
Flush the toilet a couple of times to make sure that all the water is drained. It may take three to five flushes to empty the tank. It’s fine if there’s a small amount of water left but your hands will get wet.
The water may flow out at a certain point and you will have to soak it up with a rag. For ease and convenience, you will also have to dry the tank’s bottom by wiping a dry towel. The good news is that there are other ways to drain a tank if you can’t do it this way.
By a plunger
When you use a plunger, you have to make one or two flushes to make sure most of the water drains. Then, you can put it on the hole at the toilet’s bottom and create a strong suction.
Keep pulling the plunger up and down for ten minutes or more if necessary. Take your time Stop when you have removed all the water. Have a break before flushing to ensure that the tank is empty.
Bail water
You’ll find that this method takes more time than others. It’s your solution for when the water level inside the tank doesn’t budge. A cup or bowl can be your aid in getting the water out of the tank. The first steps recommended are turning off the water supply and flushing.
Open the tank’s lid to scoop up the water using a cup or bowl. You may prepare a bucket to collect the water or you can pour it on the sink. This process can take several minutes but it works when you’re left with no other options.
When you reach the bottom of the tank, you can take out the remaining water with a sponge, rag, or towel. You have to wring the sponge or cloth for the bucket or sink to catch the water. Use a towel to dry out the bottom of the toilet and you’re good to go!
A dry or wet vac
When you have a little patience in bailing, you can opt for dry or wet vac to draw out water from the tank. You’ll need to do this if the bowl drains properly but the water in the tank doesn’t go down.
Be careful in setting up the vacuum for the work that requires water. Always prioritize safety. Pull out the filter from the vacuum before inserting it into the toilet’s tank. Again, turn off the water supply and flush. You can turn on the vacuum after inserting the vacuum’s nozzle into the tank. Draining can take a few minutes with this method. Finally, you can mop the water with a toilet.
Siphoning
Siphoning is another way to take out water from the tank. Put on the gloves before you grab the hose to start working. Put the bucket next to you so you can easily collect the water.
Once you remove the tank’s lid, you have to cover the ends of the hose with your hands or fingers. One end of the hose should be in the bucket while it’s being covered. Meanwhile, the other end is uncovered and in the tank.
Let the water proceed to the bucket and you’ll know that the water reached the bottom of the tank if the flow slows down.
Step 3: Disconnecting the hose of the water supply
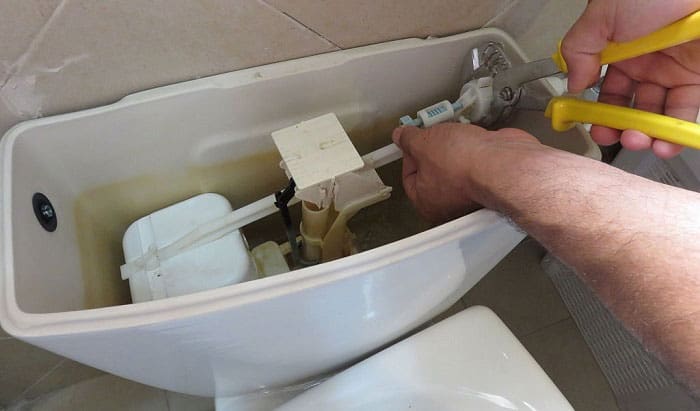
You have to be ready for some water that would spill so put a bucket or a towel under the supply hose. Next, remove the mounting nut from the toilet tank underside. Unscrew the plastic nut with the help of pliers or a wrench and set it aside for later use.
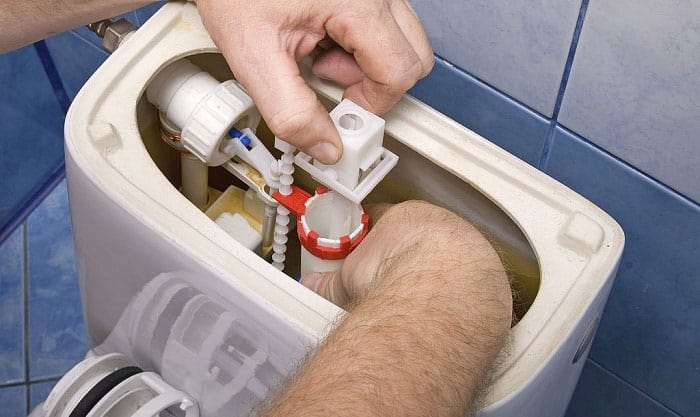
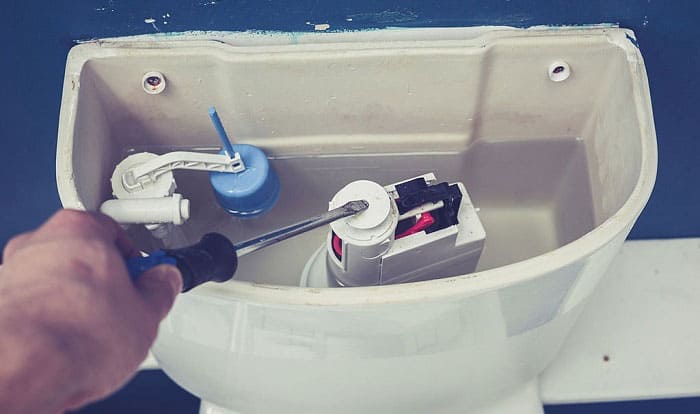
Step 4: The proper way of removing the plastic nut
You can use any of the tools mentioned above. Turn the nut slowly so it will come loose and pull it away from the tank. At some point, you will be challenged to remove a stuck plastic lock nut. Just wet a rag with hot water and put it over the nut. Then, you can put the wrench on the rag to twist the nut.
For more tips on removing plastic nuts from toilet tanks, watch this well-made video!
What Would You Do With a Stuck Lock Nut?
Apart from the wet rag, there are other ways to remove stuck lock nuts on a toilet. The best way to resolve this issue is lubricating the nut with a plumber’s grease, which should sit for 10 to 15 minutes. Never think of using petroleum jelly as it can backfire.
You may also remove the plastic using a pair of locking pliers. This type of pliers won’t limit you to applying more force in gripping the target part. Set the pliers in their narrowest position so you can have a good grasp on the nut. Hence, it’s manageable to twist it when applying force.
Another thing that you can do is utilize an angle grinder that can have a bite on the plastic nut to be able to pull it out. However, it won’t always work as expected; not all angle grinders are compatible with a toilet tank. While using this tool, you must wear safety gloves and goggles.
Tips to prevent the plastic nut from getting stuck
Unfortunately, the common reason for removing the plastic nut is when it gets stuck. Once damaged, replacement is automatically required. To free you from this circumstance, here are some tips.
Be wise enough to mount the nut against the flange made of brass, which is resistant to corrosion and rust. Therefore, it doesn’t prevent the nut from getting stuck. An extra coating of liquor or nail polish on the nut will also be great as you can remove it with ease.
What to Do When the Plastic Nut Doesn’t Come Off Right Away
You may find yourself having a tough time removing the plastic nut. There might be rust or debris that surrounds the nut. So, what do you have to do? A wire brush can sweep the rust and debris from the nut.
Grime build-up can also be the culprit of stuck nuts. You can depend on a wire brush to eliminate external build-up. Use a hammer or chisel to tap the wrench or pliers after you make adjustments on the nut.
Successfully Removing the Plastic Nut from the Toilet Tank!
The ways on how to remove plastic nut from toilet tank seem easy. However, you need to set your expectation that it takes time and patience. Even so, you can have your way out with the appropriate tools and techniques introduced by this article.

I’m Paulk Webb, and I work as a writer for Saveourwaterrebates. I’m happy to put in the time and effort to conduct market research to identify the most pressing issues faced by households concerning their plumbing. Feel free to check out our guides to get the most informed recommendations for how to solve your problems.