

“Can you paint a toilet?”. The answer is a definite yes! Painting a toilet may not be a typical home improvement project, but it can be a creative and budget-friendly way to refresh the look of your bathroom.
In this guide, we’ll explore the steps and considerations involved in redecorating a toilet. We’ll show you how to completely revamp a toilet using simple materials such as paint, primer, and sandpaper.
Read on for a detailed guide.
Table of Contents
Can You Change the Color of a Toilet?
Changing the color & design of a toilet is 100% doable. It helps create a unique vibe for the whole restroom without the expense of replacing the entire fixture. However, you need to pick the right type of paint.
Choose spray paint if you want to paint the inside of the toilet bowl. The valve of the aerosol paint allows you to apply the paint in a fine, even mist. However, you might need to apply a second coat of epoxy sealer to protect the paint from moisture.
If you want to skip applying an epoxy sealer, you can choose an epoxy paint for the toilet instead. This type of paint offers a stronger bond and moisture resistance, but the colors available are limited, and curing time might take longer.
Step-by-step Guide to Painting a Toilet
Step 1: Prepare
Aside from paint, you also need these other supplies:
- Acrylic latex primer to use as a base coat
- Protective gear like gloves, goggles, and mask
- Cleaning materials (e.g. toilet cleaner, brush. etc.)
- Pliers (optional)
- 120-grit sandpaper
- Painter’s tape or plastic sheets
- Paintbrush if using non-spray paint
Once you have gathered all the supplies, it’s time to get into action. Here are the steps.
Step 2: Remove The Toilet Seat

The first step is to get the seat out of the way. This step is pretty straightforward. Simply remove the bolts at the back of the seat using your hand or a pair of pliers.
You can paint the seat if you like, but purchasing a new one is more practical, especially if you own a plastic one.
Step 3: Clean The Toilet
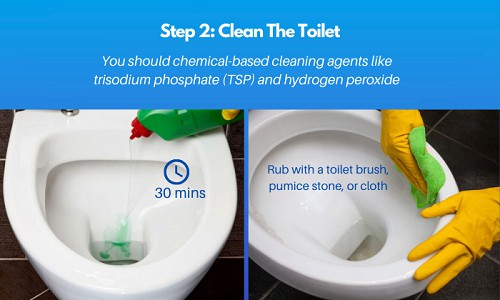
Whether you decide to use a spray or epoxy paint for the toilet, you’ll want the surface cleaned before you start painting. The paint doesn’t adhere when the surface is dirty.
- First, apply the cleaner to the toilet. We recommend using chemical-based cleaning agents like trisodium phosphate (TSP) and hydrogen peroxide to remove hard stains and debris. If you own a porcelain toilet, dilute the solution with water.
- Let the solution sit for 30 minutes.
- Rub with a toilet brush, pumice stone, or cloth.
- Flush to wash away all the dirt, debris, and stains.
*TIP: Use goggles and gloves for protection.
Step 4: Empty The Bowl And Tank

Once the toilet is properly cleaned, turn off your water supply valve to empty the toilet bowl. You don’t want any water getting in the way when you paint a toilet bowl inside and out.
You should see the valve at the bottom left of the toilet. Turn the valve clockwise to the flow of water.
Next, take a look inside your toilet tank. If there’s water, flush it out. You want it dry to prevent any water from leaking into the toilet.
Step 5: Sand The Toilet

Like any painting preparations, you need to sand the surface when you paint for toilets. The toilet has a naturally smooth finish that prevents any paint from sticking to the surface. Before you start sanding, wear your face mask to prevent inhaling the tiny particles of porcelain or ceramic dust.
Grab the 120-grit sandpaper and rub it on the surface you want to paint. Continue sanding the surface until it feels slightly rough.
Step 6: Apply Painter’s Tape
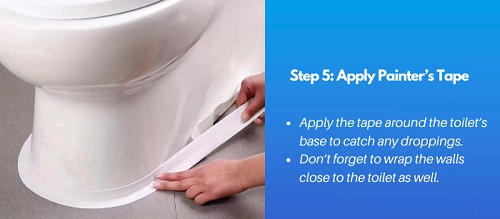
You know how messy it can be when you use spray paint in the toilet. For this reason, you need to protect your bathroom floor and walls with tape or any plastic sheet.
Apply the tape around the toilet’s base to catch any droppings. Some paint may splash into the walls, so don’t forget to wrap the walls close to the toilet as well. You can also wrap the nearest fixtures with a plastic sheet.
Step 7: Prime The Surface
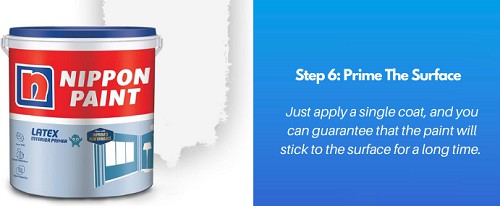
Can a toilet be painted without a primer? No, skipping this process will prevent the paint from adhering to the surface, whether you use epoxy or spray paint. You’ll want to use acrylic latex primer because it’s more fast-drying and durable than oil-based ones.
Just apply a single coat, and you can guarantee that the paint will stick to the surface for a long time. Let it dry overnight before you proceed to the next step.
Step 8: Paint With Your Desired Color

At this point, you should have decided what type of paint and color to use. Choose a color that you fancy. You can have your toilet painted white again, but having a new color will be more refreshing.
Apply the paint according to the manufacturer’s guidelines. If you use spray paint, don’t forget to apply another layer of epoxy sealer to waterproof your toilet. You don’t need to apply a sealer if you use epoxy paint.
Once the paint is dry, return the seat and turn the water valve back on.
Conclusion
The next time someone asks you, “Can you paint a toilet?” you can confidently answer that you surely can. Applying new paint is easy if you do the right preparations, like cleaning, sanding, and priming. Also, it’s fun putting new paint on your old toilet because it instantly offers a new look to your bathroom.
Let us know what you thought about the process of painting a toilet below. If you like this article, please share it with your friends.

I’m Paulk Webb, and I work as a writer for Saveourwaterrebates. I’m happy to put in the time and effort to conduct market research to identify the most pressing issues faced by households concerning their plumbing. Feel free to check out our guides to get the most informed recommendations for how to solve your problems.